Skrub @ PyLadies Tampere

2026-05-28

Roadmap for the presentation

  • What is skrub
  • Contributing to skrub: setting up the environment
  • Contributing to skrub: subjects

What is skrub?

Skrub is a Python library that sits between data stored in dataframes and machine learning with scikit-learn.

Skrub eases preprocessing and machine learning with dataframes.

Skrub compatibility

  • Skrub is mostly written in Python, but it includes some Javascript
  • Skrub is fully compatible with pandas and polars
    • Any feature needs to be supported by both libraries
  • Skrub transformers are fully compatible with scikit-learn
    • Transformers need to satisfy some requirements

skrub.TableReport

from skrub import TableReport
TableReport(employee_salaries)

TableReport Preview

Main features:

  • Obtain high-level statistics about the data
  • Explore the distribution of values and find outliers
  • Discover highly correlated columns
  • Export and share the report as an HTML file

Data cleaning with pandas/polars: setup

import pandas as pd
import numpy as np

data = {
    "Int": [2, 3, 2],  # Multiple unique values
    "Const str": ["x", "x", "x"],  # Single unique value
    "Str": ["foo", "bar", "baz"],  # Multiple unique values
    "All nan": [np.nan, np.nan, np.nan],  # All missing values
    "All empty": ["", "", ""],  # All empty strings
    "Date": ["01 Jan 2023", "02 Jan 2023", "03 Jan 2023"],
}

df_pd = pd.DataFrame(data)
display(df_pd)
Int Const str Str All nan All empty Date
0 2 x foo NaN 01 Jan 2023
1 3 x bar NaN 02 Jan 2023
2 2 x baz NaN 03 Jan 2023

Nulls, datetimes, constant columns with pandas/polars

# Parse the datetime strings with a specific format
df_pd['Date'] = pd.to_datetime(df_pd['Date'], format='%d %b %Y')

# Drop columns with only a single unique value
df_pd_cleaned = df_pd.loc[:, df_pd.nunique(dropna=True) > 1]

# Function to drop columns with only missing values or empty strings
def drop_empty_columns(df):
    # Drop columns with only missing values
    df_cleaned = df.dropna(axis=1, how='all')
    # Drop columns with only empty strings
    empty_string_cols = df_cleaned.columns[df_cleaned.eq('').all()]
    df_cleaned = df_cleaned.drop(columns=empty_string_cols)
    return df_cleaned

# Apply the function to the DataFrame
df_pd_cleaned = drop_empty_columns(df_pd_cleaned)

skrub.Cleaner

from skrub import Cleaner
cleaner = Cleaner(drop_if_constant=True, datetime_format='%d %b %Y')
df_cleaned = cleaner.fit_transform(df_pd)
display(df_cleaned)
Int Str Date
0 2 foo 2023-01-01
1 3 bar 2023-01-02
2 2 baz 2023-01-03

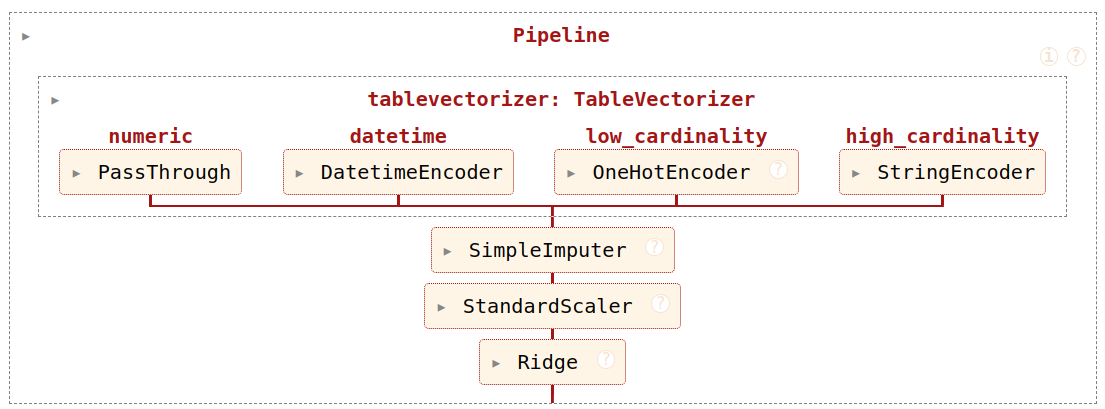
Encoding all the features: TableVectorizer

from skrub import TableVectorizer

table_vec = TableVectorizer()
df_encoded = table_vec.fit_transform(df_pd)

The TableVectorizer:

  • Applies the Cleaner to all columns
  • Splits columns by dtype and # of unique values
  • Encodes each column according to its characteristics

Encoding all the features: TableVectorizer

Build a predictive pipeline with tabular_pipeline

import skrub
from sklearn.linear_model import Ridge
model = skrub.tabular_pipeline(Ridge())

Encoding all the features: under the hood

  • DatetimeEncoder: convert datetimes to numerical columns (year, month, day …)
  • SquashingScaler: safely scale numerical features in presence of outliers
  • StringEncoder: quick, robust encoding of categorical and discrete features
  • TextEncoder: encode text and strings using pre-trained language models

Resources and contacts

Do you want to learn more?

Follow skrub on:

Star skrub on GitHub, or contribute directly:

Contributing to skrub: preparation

Instructions are also available in the Installation page

Setting up the repository

First off, you need to fork the skrub repository

Then, clone the repo on your local machine

git clone https://github.com/<YOUR_USERNAME>/skrub
cd skrub

Add the upstream remote to pull the latest version of skrub:

git remote add upstream https://github.com/skrub-data/skrub.git

You can check that the remote has been added with git remote -v.

Setting up the environment

Tip

Use any env tool you’re comfortable with! If you have never used virtual environments before, use venv.

From inside the skrub directory you just cloned:

  • Create the venv (in the current dir):
python -m venv dev-skrub
  • Activate the venv:
source dev-skrub/bin/activate
  • Install skrub and dependencies:
pip install -e ".[dev]"
  • Create the venv (in the current dir):
uv venv dev-skrub 
  • Activate the venv:
source activate 
  • Install skrub and dev dependencies:
uv pip install -e ".[dev]"
  • Create the conda environment:
conda create -n dev-skrub
  • Activate the enviornment
conda activate dev-skrub
  • Install skrub and dependencies:
pip install -e ".[dev]"
#  Install an environment:
pixi install dev
# activate dev from IDE
# Run a command in a specific environment:
pixi run -e ci-py309-min-deps COMMAND
# Spawn a shell with the given env:
pixi shell -e ci-latest-optional-deps

Note on the pixi.lock file

Important

If you use pixi, it may happen that the pixi.lock file will be updated as you run commands.

Revert changes to this file before adding files and pushing upstream.

Running tests

From inside the root skrub folder, and after activating the environment

pytest --pyargs skrub

Run all tests (you will be prompted to choose an env, you can pick dev):

pixi run test

Run tests in a specific env

pixi run -e dev test

Running tests

Tests are stored in skrub/tests, or in a tests subfolder.

It is possible to run specific tests by providing a path. To test TableVectorizer:

pytest -vsl skrub/tests/test_table_vectorizer.py 

-vsl prints out more information compared to the default.

Working on the documentation

Docs are written in RST and use the Sphinx library for rendering, cross-references and everything else.

Build the doc from the doc folder using:

# Build the full documentation, including examples
make html
# on Windows
make.bat html

# Build documentation without running examples (faster)
make html-noplot
# on Windows
make.bat html-noplot

# Clean previously built documentation
make clean
# on Windows
make.bat clean

From the skrub root folder (where pyproject.toml is):

# Build the full documentation, including examples
pixi run build-doc

# Build documentation without running examples (faster)
pixi run build-doc-quick

# Clean previously built documentation
pixi run clean-doc

After rendering the docs, open the doc/_build/html/index.html file with a browser.

Writing an example

  • Examples are python scripts placed in the examples/ folder.
  • The narrative of the examples should be written in comments and can include RST syntax.
  • Before commmitting, the documentation should be built (at least in quick mode) to check that the example is being rendered correctly.

Full guide

Opening a PR and contributing upstream

More detail is available in the contributing guide

Start by creating a branch:

# fetch latest updates and start from the current head
git fetch upstream
# create a new branch and switch to it 
git checkout -b my-branch-name-eg-fix-issue-123

Make some changes, then:

git add ./the/file-i-changed
git commit -m "my message"
git push --set-upstream origin my-branch-name-eg-fix-issue-123

At this point, visit the GitHub PR page and open a PR from there.

About upstream and on avoiding conflicts

upstream/main is the “ground truth” for the repository. It is very important to keep up to date with upstream/main to avoid conflicts. This can be done by routinely merging your branch with upstream/main.

# verify you're on your branch with 
git status
# On branch my-branch-name
# Your branch is up to date with 'origin/my-branch-name'.

# fetch from upstream
git fetch upstream

# merge with upstream
git merge upstream/main

Important

Remember: you’re bringing information from upstream/main into my-branch-name, so you need to be inside my-branch-name and merge with upstream/main.

Code formatting and pre-commit

Skrub enforces some strict formatting rules to ensure code quality. This is done through pre-commit hooks. pre-commit must be installed, then it will run before every commit.

  • Make sure pre-commit is installed in the current environment
pre-commit install
# install with pip if needed
pip install pre-commit

Then, add modified files and run pre-commit on them.

git add YOUR_FILE
pre-commit
# if the file has been formatted, add again
git add YOUR_FILE
# commit the changes
git commit -m "MY COMMIT MESSAGE"
# pre-commit will run again automatically
# push the  commit
git push

If you’re working entirely with pixi:

git add YOUR_FILE
pixi run lint
# if the file has been formatted, add again
git add YOUR_FILE
# commit the changes
git commit -m "MY COMMIT MESSAGE"
# pre-commit will run again automatically
# push the  commit
git push

Code formatting and pre-commit

Note

In some cases, pre-commit will prevent you from committing, but won’t be able to fix the problem on its own. In those cases, you will have to address the issue manually.

Contributing to skrub: open issues

GitHub project

Before you start working on an issue

Important

Write a comment on the issue so we know you’re working on it.

We want to avoid having multiple people working on the same issue in separate PRs.

Legend:

  • 😴 : easy issue
  • 🍁 : some complexity
  • 👺 : hard problem
  • 🏃‍♀️ : quick to solve
  • 🛌 : likely will take a while
  • 🐈 : docs, involves Sphinx

TableReport

  • #2043 - Add a write_json function that works like write_html to the TableReport 😴 ️ 🏃
  • #1244 - Add a ColumnReport 👺🛌
  • #2063 - Add the estimated size in memory of a dataframe 👺 🛌

New features

  • #2066 - Add numpy support to .skb.concatenate🍁
  • #2068 - Improve error message when inputting an array in choose_from 🍁 🏃

Bugfixes and maintenance

  • #1747 - Improve the error message shown by the association tab in the TableReport when only one column is present😴 🏃
  • #1464 - Deprecate the order_by parameter of the TableReport🍁 🏃

Documentation

  • #991 - Move the dev docs of the TableReport to the main documentation page. 🍁 🐈
  • #690 - Divide examples in sections 😴 🐈 🏃
  • #2064 - Sort long API reference sections 😴 🐈 🏃

Examples

  • #1629 - Add an example for the DatetimeEncoder. 👺 🛌 🐈
  • #1476 - DOC: add an example dedicated to showing the features of the TableReport. 🍁 🛌 🐈
  • Any example you can come up with!