Women in Machine Learning & Data Science

Skrub - machine learning with dataframes

Riccardo Cappuzzo

Probabl

2025-10-29

whoami

  • I am a research engineer at Inria as part of the P16 project, and I am the lead developer of skrub

  • I’m Italian, but I don’t drink coffee, wine, and I like pizza with fries

  • I did my PhD in Côte d’Azur, but I moved to Paris because it was too sunny and I don’t like the sea

Who are you?

  • Who is familiar with Pandas or Polars?

  • Who has worked with scikit-learn?

  • Who has already made contributions in open source?

  • Who has heard of skrub before today?

Roadmap for the presentation

  • What is skrub
  • Contributing to skrub: subjects
  • Contributing to skrub: setting up the environment

QR code for the presentation at the end!

What is skrub?

Tip

Skrub is a Python library that sits between data stored in dataframes and machine learning with scikit-learn.

Skrub eases machine learning with dataframes.

Skrub compatibility

  • Skrub is mostly written in Python, but it inlcudes some Javascript
  • Skrub is fully compatible with pandas and polars
    • Any feature needs to be supported by both libraries
  • Skrub transformers are fully compatible with scikit-learn
    • Transformers need to satisfy some requirements

First, an example pipeline

  1. Gather some data
  2. Explore the data
  3. Preprocess the data
  4. Perform feature engineering
  5. Build a scikit-learn pipeline
  6. ???
  7. Profit?

skrub.TableReport

from skrub import TableReport
TableReport(employee_salaries)

TableReport Preview

Main features:

  • Obtain high-level statistics about the data
  • Explore the distribution of values and find outliers
  • Discover highly correlated columns
  • Export and share the report as an html file

skrub.TableReport

  • The report uses uses Jinjia templates and Javascript for interactivity
  • The backend is in Python
  • Space is limited, need to maximize information density.
  • Light > feature-rich (no plotly)

Data cleaning with pandas/polars: setup

import pandas as pd
import numpy as np

data = {
    "Int": [2, 3, 2],  # Multiple unique values
    "Const str": ["x", "x", "x"],  # Single unique value
    "Str": ["foo", "bar", "baz"],  # Multiple unique values
    "All nan": [np.nan, np.nan, np.nan],  # All missing values
    "All empty": ["", "", ""],  # All empty strings
    "Date": ["01 Jan 2023", "02 Jan 2023", "03 Jan 2023"],
}

df_pd = pd.DataFrame(data)
display(df_pd)
Int Const str Str All nan All empty Date
0 2 x foo NaN 01 Jan 2023
1 3 x bar NaN 02 Jan 2023
2 2 x baz NaN 03 Jan 2023
import polars as pl
import numpy as np
data = {
    "Int": [2, 3, 2],  # Multiple unique values
    "Const str": ["x", "x", "x"],  # Single unique value
    "Str": ["foo", "bar", "baz"],  # Multiple unique values
    "All nan": [np.nan, np.nan, np.nan],  # All missing values
    "All empty": ["", "", ""],  # All empty strings
    "Date": ["01 Jan 2023", "02 Jan 2023", "03 Jan 2023"],
}

df_pl = pl.DataFrame(data)
display(df_pl)
shape: (3, 6)
Int Const str Str All nan All empty Date
i64 str str f64 str str
2 "x" "foo" NaN "" "01 Jan 2023"
3 "x" "bar" NaN "" "02 Jan 2023"
2 "x" "baz" NaN "" "03 Jan 2023"

Nulls, datetimes, constant columns with pandas/polars

# Parse the datetime strings with a specific format
df_pd['Date'] = pd.to_datetime(df_pd['Date'], format='%d %b %Y')

# Drop columns with only a single unique value
df_pd_cleaned = df_pd.loc[:, df_pd.nunique(dropna=True) > 1]

# Function to drop columns with only missing values or empty strings
def drop_empty_columns(df):
    # Drop columns with only missing values
    df_cleaned = df.dropna(axis=1, how='all')
    # Drop columns with only empty strings
    empty_string_cols = df_cleaned.columns[df_cleaned.eq('').all()]
    df_cleaned = df_cleaned.drop(columns=empty_string_cols)
    return df_cleaned

# Apply the function to the DataFrame
df_pd_cleaned = drop_empty_columns(df_pd_cleaned)
# Parse the datetime strings with a specific format
df_pl = df_pl.with_columns([
    pl.col("Date").str.strptime(pl.Date, "%d %b %Y", strict=False).alias("Date")
])

# Drop columns with only a single unique value
df_pl_cleaned = df_pl.select([
    col for col in df_pl.columns if df_pl[col].n_unique() > 1
])

# Import selectors for dtype selection
import polars.selectors as cs

# Drop columns with only missing values or only empty strings
def drop_empty_columns(df):
    all_nan = df.select(
        [
            col for col in df.select(cs.numeric()).columns if 
            df [col].is_nan().all()
        ]
    ).columns
    
    all_empty = df.select(
        [
            col for col in df.select(cs.string()).columns if 
            (df[col].str.strip_chars().str.len_chars()==0).all()
        ]
    ).columns

    to_drop = all_nan + all_empty

    return df.drop(to_drop)

df_pl_cleaned = drop_empty_columns(df_pl_cleaned)

skrub.Cleaner

from skrub import Cleaner
cleaner = Cleaner(drop_if_constant=True, datetime_format='%d %b %Y')
df_cleaned = cleaner.fit_transform(df_pd)
display(df_cleaned)
Int Str Date
0 2 foo 2023-01-01
1 3 bar 2023-01-02
2 2 baz 2023-01-03
from skrub import Cleaner
cleaner = Cleaner(drop_if_constant=True, datetime_format='%d %b %Y')
df_cleaned = cleaner.fit_transform(df_pl)
display(df_cleaned)
shape: (3, 3)
Int Str Date
i64 str date
2 "foo" 2023-01-01
3 "bar" 2023-01-02
2 "baz" 2023-01-03

skrub.Cleaner

  • The actual transformations are performed in part by skrub.DropUninformative.
  • New criteria for selecting columns should go in DropUninformative.

skrub.DatetimeEncoder

from skrub import DatetimeEncoder, ToDatetime

X_date = ToDatetime().fit_transform(df["date"])
de = DatetimeEncoder(resolution="second")
# de = DatetimeEncoder(periodic_encoding="spline")
X_enc = de.fit_transform(X_date)
print(X_enc)
shape: (3, 7)
┌───────────┬────────────┬──────────┬───────────┬─────────────┬─────────────┬────────────────────┐
│ date_year ┆ date_month ┆ date_day ┆ date_hour ┆ date_minute ┆ date_second ┆ date_total_seconds │
│ ---       ┆ ---        ┆ ---      ┆ ---       ┆ ---         ┆ ---         ┆ ---                │
│ f32       ┆ f32        ┆ f32      ┆ f32       ┆ f32         ┆ f32         ┆ f32                │
╞═══════════╪════════════╪══════════╪═══════════╪═════════════╪═════════════╪════════════════════╡
│ 2023.0    ┆ 1.0        ┆ 1.0      ┆ 12.0      ┆ 34.0        ┆ 56.0        ┆ 1.6726e9           │
│ 2023.0    ┆ 2.0        ┆ 15.0     ┆ 8.0       ┆ 45.0        ┆ 23.0        ┆ 1.6765e9           │
│ 2023.0    ┆ 3.0        ┆ 20.0     ┆ 18.0      ┆ 12.0        ┆ 45.0        ┆ 1.6793e9           │
└───────────┴────────────┴──────────┴───────────┴─────────────┴─────────────┴────────────────────┘

Encoding categorical (string/text) features

Categorical features have a “cardinality”: the number of unique values

  • Low cardinality: OneHotEncoder
  • High cardinality (>40 unique values): skrub.StringEncoder
  • Text: skrub.TextEncoder and pretrained models from HuggingFace Hub

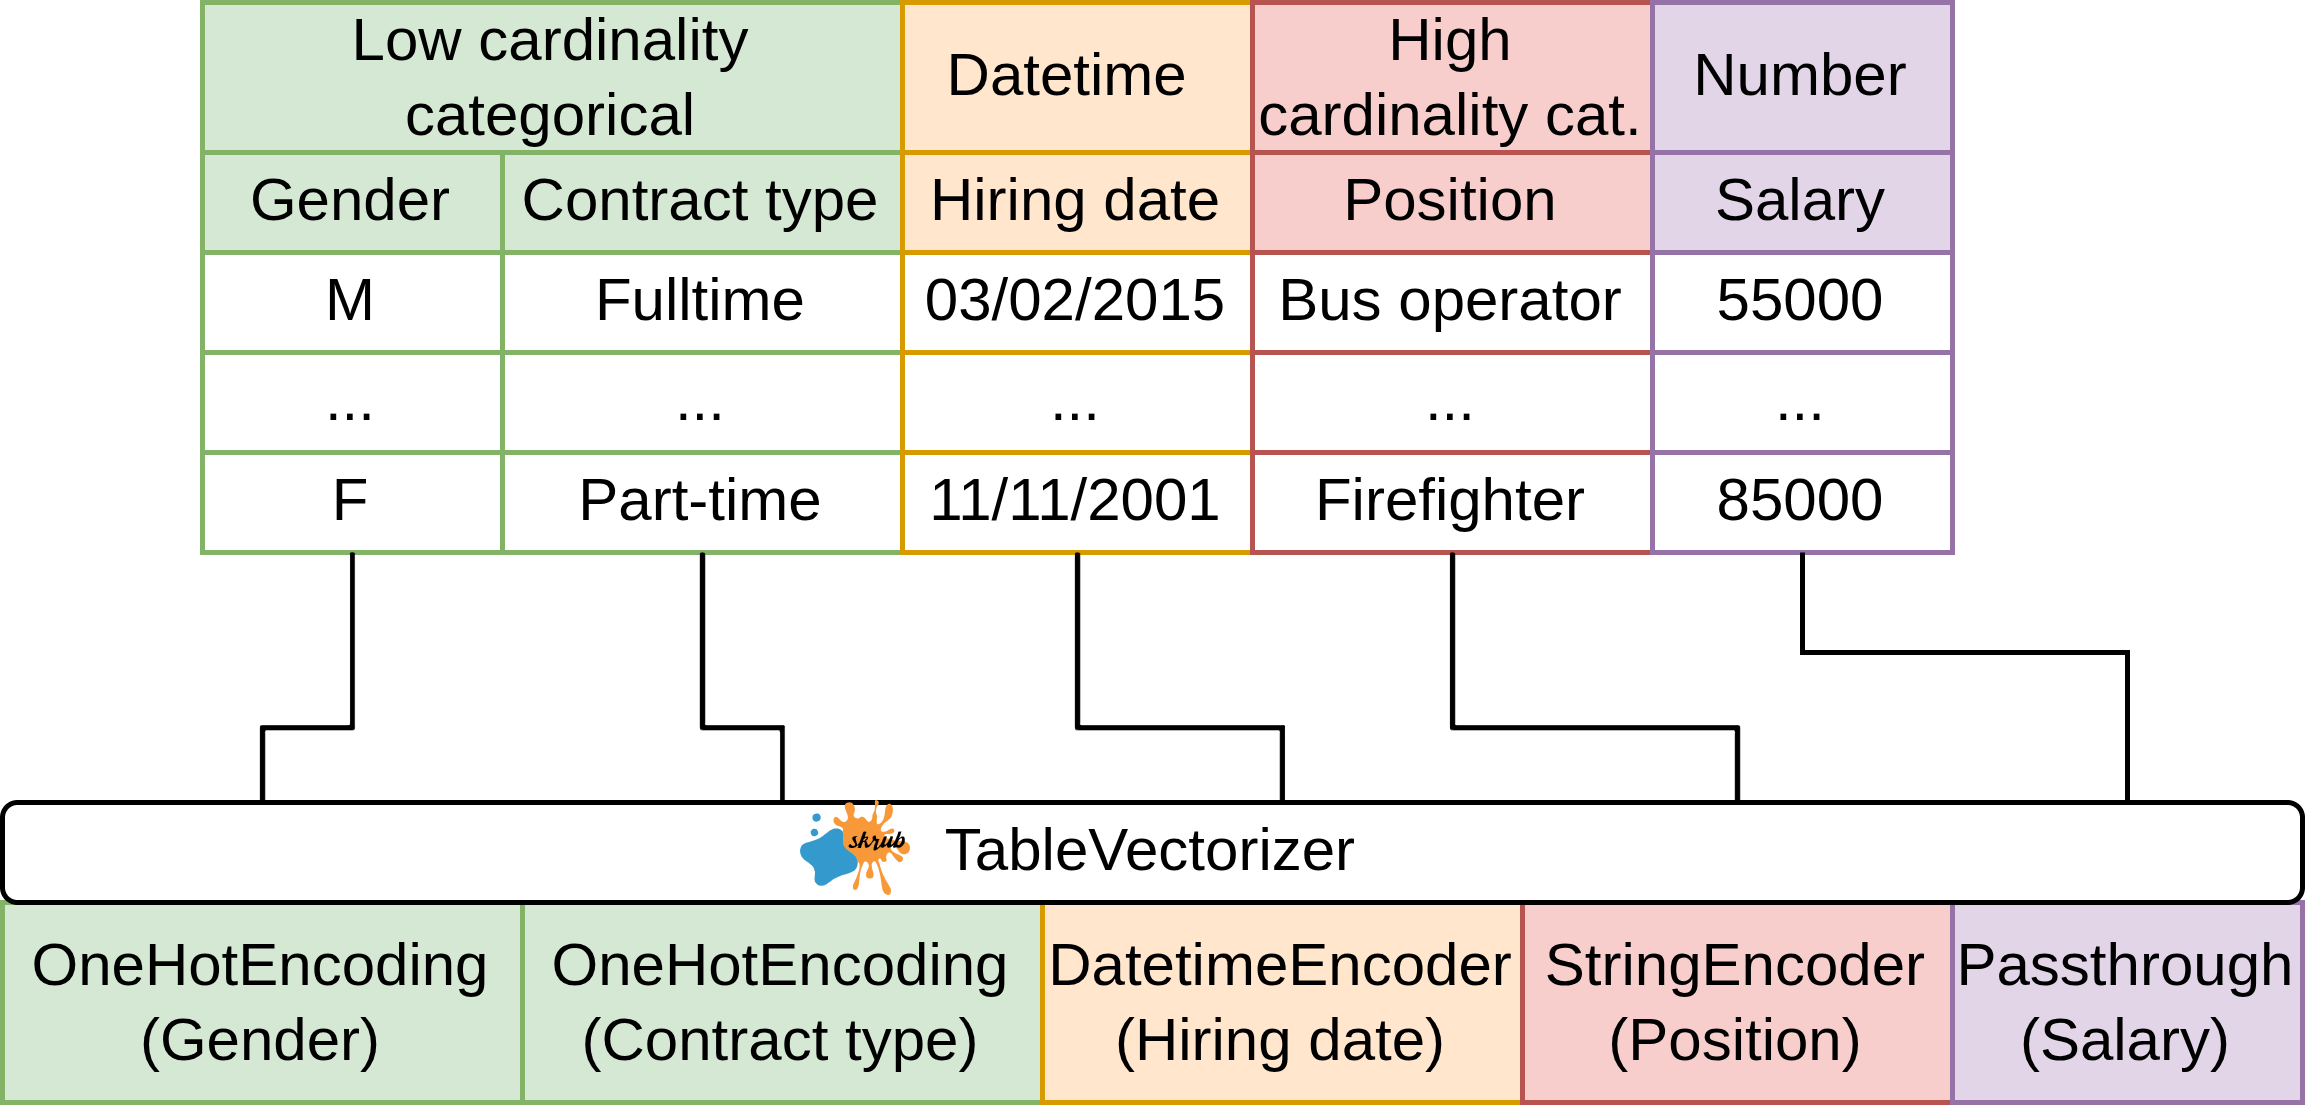
Encoding all the features: TableVectorizer

from skrub import TableVectorizer

table_vec = TableVectorizer()
df_encoded = table_vec.fit_transform(df)
  • Apply the Cleaner to all columns
  • Split columns by dtype and # of unique values
  • Encode each column separately

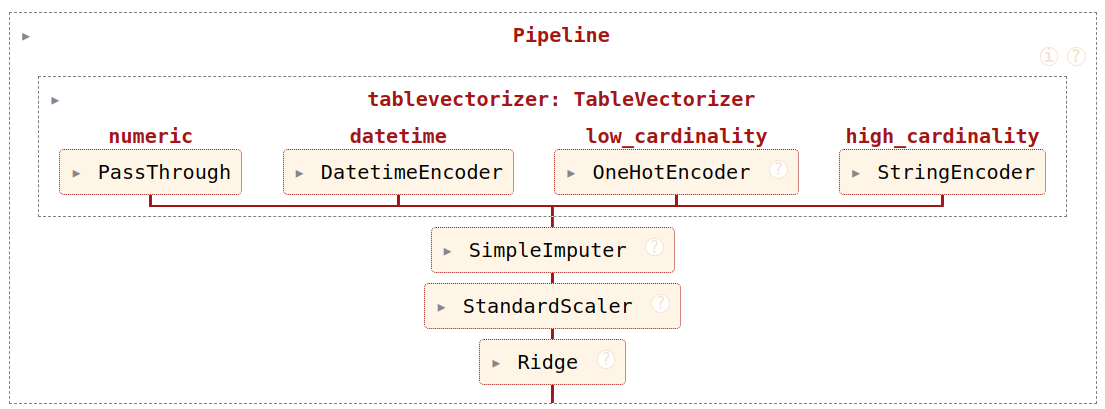
Encoding all the features: TableVectorizer

Build a predictive pipeline with tabular_pipeline

import skrub
from sklearn.linear_model import Ridge
model = skrub.tabular_pipeline(Ridge())

Advanced skrub: Data Ops

DataOps…

  • Extend the scikit-learn machinery to complex multi-table operations, and take care of data leakage
  • Track all operations with a computational graph (a Data Ops plan)
  • Are transparent and give direct access to the underlying object
  • Allow tuning any operation in the Data Ops plan
  • Guarantee that all operations are reproducible
  • Can be persisted and shared easily

How do DataOps work, though?

DataOps wrap around user operations, where user operations are:

  • any dataframe operation (e.g., merge, group by, aggregate etc.)
  • scikit-learn estimators (a Random Forest, RidgeCV etc.)
  • custom user code (load data from a path, fetch from an URL etc.)

Important

DataOps record user operations, so that they can later be replayed in the same order and with the same arguments on unseen data.

Starting with the DataOps

import skrub
data = skrub.datasets.fetch_credit_fraud()

baskets = skrub.var("baskets", data.baskets)
products = skrub.var("products", data.products) # add a new variable

X = baskets[["ID"]].skb.mark_as_X()
y = baskets["fraud_flag"].skb.mark_as_y()
  • baskets and products represent inputs to the pipeline.
  • Skrub tracks X and y so that training and test splits are never mixed.

Applying a transformer

from skrub import selectors as s

vectorizer = skrub.TableVectorizer(
    high_cardinality=skrub.StringEncoder()
)
vectorized_products = products.skb.apply(
    vectorizer, cols=s.all() - "basket_ID"
)

Executing dataframe operations

aggregated_products = vectorized_products.groupby(
    "basket_ID"
).agg("mean").reset_index()

features = X.merge(
    aggregated_products, left_on="ID", right_on="basket_ID"
)
features = features.drop(columns=["ID", "basket_ID"])

Applying a ML model

from sklearn.ensemble import ExtraTreesClassifier  
predictions = features.skb.apply(
    ExtraTreesClassifier(n_jobs=-1), y=y
)

Inspecting the Data Ops plan

predictions.skb.full_report()


Execution report

Each node:

  • Shows a preview of the data resulting from the operation
  • Reports the location in the code where the code is defined
  • Shows the run time of the node

Exporting the plan in a learner

The Learner is a stand-alone object that works like a scikit-learn estimator that takes a dictionary as input rather than just X and y.

learner = predictions.skb.make_learner(fitted=True)

Then, the learner can be pickled …

import pickle

with open("learner.bin", "wb") as fp:
    pickle.dump(learner, fp)

… loaded and applied to new data:

with open("learner.bin", "rb") as fp:
    loaded_learner = pickle.load(fp)
data = skrub.datasets.fetch_credit_fraud(split="test")
new_baskets = data.baskets
new_products = data.products
loaded_learner.predict({"baskets": new_baskets, "products": new_products})
array([0, 0, 0, ..., 0, 0, 0], shape=(31549,))

Hyperparameter tuning in a Data Ops plan

  • choose_from: select from the given list of options
  • choose_int: select an integer within a range
  • choose_float: select a float within a range
  • choose_bool: select a bool
  • optional: chooses whether to execute the given operation

Tuning in scikit-learn can be complex

pipe = Pipeline([("dim_reduction", PCA()), ("regressor", Ridge())])
grid = [
    {
        "dim_reduction": [PCA()],
        "dim_reduction__n_components": [10, 20, 30],
        "regressor": [Ridge()],
        "regressor__alpha": loguniform(0.1, 10.0),
    },
    {
        "dim_reduction": [SelectKBest()],
        "dim_reduction__k": [10, 20, 30],
        "regressor": [Ridge()],
        "regressor__alpha": loguniform(0.1, 10.0),
    },
    {
        "dim_reduction": [PCA()],
        "dim_reduction__n_components": [10, 20, 30],
        "regressor": [RandomForestRegressor()],
        "regressor__n_estimators": loguniform(20, 200),
    },
    {
        "dim_reduction": [SelectKBest()],
        "dim_reduction__k": [10, 20, 30],
        "regressor": [RandomForestRegressor()],
        "regressor__n_estimators": loguniform(20, 200),
    },
]

Tuning with Data Ops is simple!

dim_reduction = X.skb.apply(
    skrub.choose_from(
        {
            "PCA": PCA(n_components=skrub.choose_int(10, 30)),
            "SelectKBest": SelectKBest(k=skrub.choose_int(10, 30))
        }, name="dim_reduction"
    )
)
regressor = dim_reduction.skb.apply(
    skrub.choose_from(
        {
            "Ridge": Ridge(alpha=skrub.choose_float(0.1, 10.0, log=True)),
            "RandomForest": RandomForestRegressor(
                n_estimators=skrub.choose_int(20, 200, log=True)
            )
        }, name="regressor"
    )
)

Exploring the hyperparameters

search = pred.skb.get_randomized_search(fitted=True)
search.plot_parallel_coord()

Resources and contacts

Examples and guides

Getting involved

Do you want to learn more?

Follow skrub on:

Star skrub on GitHub, or contribute directly:

Contributing to skrub: open issues

GitHub project

Before you start working on an issue

Important

Write a comment on the issue so we know you’re working on it.

We want to avoid having multiple people working on the same issue in separate PRs.

Legend:

  • 😴 : easy issue
  • 🍁 : some complexity
  • 👺 : hard problem
  • 🏃‍♀️ : quick to solve
  • 🛌 : likely will take a while
  • 🐈 : docs, need to deal with Sphinx

TableReport

  • #1175 - Better control over the TableReport’s progress display. 👺 🛌
  • #1523 - Fix the behavior of the TableReport when max_plot_columns is set to None. 🍁 🏃
  • #1178 - Shuffle the rows of the TableReport example in the home page. 😴 🏃

New transformers

  • #1001 - Add a DropSimilar transformer. 👺 🛌
  • #710 - Add holidays as features. 👺 🛌
  • #1677 - Make a public ToFloat.🍁 🛌
  • #1542 - Add a transformer that parses string columns that include units (kg, $ etc). 👺 🛌
  • #1430 - Extend ToDatetime so that it can take a list of datetime formats. 🍁 🛌

Bugfixes and maintenance

  • #1675 - Improve error message when the TableReport receives a lazy Polars dataframe. 😴 🏃
  • #1665 - Remove black from the project. 😴 🏃
  • #1490 - Cleaner fails when there is an empty polars column name. 👺 🏃

Documentation

  • #1476 - DOC: add an example dedicated to showing the features of the TableReport. 🍁 🛌🐈
  • #991 - Move the dev docs of the TableReport to the main documentation page. 🍁🐈
  • #1582 - Reorganize the “Development” section in the top bar. 👺 🛌🐈
  • #1425 - Shorten the note on the single-column transformer. 😴 🏃
  • #1660 - Add different doc versions to the switcher. 🍁🐈 🏃
  • #1616 - Change the numbering of examples. 😴🐈 🏃

Examples

  • #1629 - Add an example for the DatetimeEncoder. 👺 🛌🐈
  • #1234 - Shuffle the toxicity dataset in the example. 😴 🏃
  • Any example you can come up with!

Contributing to skrub: preparation

Instructions are also available in the Installation page of the webiste: https://skrub-data.org/stable/install.html

Setting up the repository

First off, you need to fork the skrub repository: https://github.com/skrub-data/skrub/fork

Then, clone the repo on your local machine

git clone https://github.com/<YOUR_USERNAME>/skrub
cd skrub

Add the upstream remote to pull the latest version of skrub:

git remote add upstream https://github.com/skrub-data/skrub.git

You can check that the remote has been added with git remote -v.

Setting up the environment

Depends on the tools you use!

From inside the skrub directory you just cloned:

  • Create the venv (in the current dir):
python -m venv dev-skrub
  • Activate the venv:
source dev-skrub/bin/activate
  • Install skrub and dependencies:
pip install -e ".[dev]"
  • Create the venv (in the current dir):
uv venv dev-skrub 
  • Activate the venv:
source activate 
  • Install skrub and dev dependencies:
uv pip install -e ".[dev]"
  • Create the conda environment:
conda create -n dev-skrub
  • Activate the enviornment
conda activate dev-skrub
  • Install skrub and dependencies:
pip install -e ".[dev]"
  • Install pixi: https://pixi.sh/latest/installation/
  • Go to the skrub folder
  • Install an environment:
pixi install dev
# activate dev from IDE
  • Run a command in a specific environment:
pixi run -e ci-py309-min-deps COMMAND
  • Spawn a shell with the given env:
pixi shell -e ci-latest-optional-deps

My recommendation: use pixi!

Note on the pixi.lock file

Important

If you use pixi, it may happen that the pixi.lock file will be updated as you run commands.

Revert changes to this file before adding files and pushing upstream.

Running tests

From inside the root skrub folder, and after activating the environment

pytest --pyargs skrub

Run all tests (you will be prompted to choose an env):

pixi run test

Run tests in a specific env

pixi run -e dev test

Running tests

Tests are stored in skrub/tests, or in a tests subfolder.

It is possible to run specific tests by providing a path. To test TableVectorizer:

pytest -vsl skrub/tests/test_table_vectorizer.py 

-vsl prints out more information compared to the default.

Working on the documentation

Docs are written in RST and use the Sphinx library for rendering, cross-references and everything else.

Build the doc from the doc folder using:

# Build the full documentation, including examples
make html

# Build documentation without running examples (faster)
make html-noplot

# Clean previously built documentation
make clean

From the skrub root folder (where pyproject.toml is):

# Build the full documentation, including examples
pixi run build-doc

# Build documentation without running examples (faster)
pixi run build-doc-quick

# Clean previously built documentation
pixi run clean-doc

After rendering the docs, open the doc/_build/html/index.html file with a browser.

Writing an example

Full guide: https://skrub-data.org/stable/tutorial_example.html

Opening a PR and contributing upstream

More detail is available on the main website: https://skrub-data.org/stable/CONTRIBUTING.html

Start by creating a branch:

# fetch latest updates and start from the current head
git fetch upstream
git checkout -b my-branch-name-eg-fix-issue-123

Make some changes, then:

git add ./the/file-i-changed
git commit -m "my message"
git push --set-upstream origin my-branch-name-eg-fix-issue-123

At this point, visit the GitHub PR page and open a PR from there: https://github.com/skrub-data/skrub/pulls

Code formatting and pre-commit

Formatting is enforced though pre-commit checks.

  • Make sure pre-commit is installed in the environment and the folder
pre-commit install
  • If missing, install it with pip
pip install pre-commit

Then, add modified files and run pre-commit on them.

git add YOUR_FILE
pre-commit
# if the file has been formatted, add again
git add YOUR_FILE
# commit the changes
git commit -m "MY COMMIT MESSAGE"
# pre-commit will run again automatically
# push the  commit
git push

If you’re working entirely with pixi:

git add YOUR_FILE
pixi run lint
# if the file has been formatted, add again
git add YOUR_FILE
# commit the changes
git commit -m "MY COMMIT MESSAGE"
# pre-commit will run again automatically
# push the  commit
git push

Where to find this presentation

Link to these slides

GitHub project